
By enabling and connecting to a Google TV streamer (or Chromecast with Google TV, or other Android TV devices) via the Android Debug Bridge, you gain a level of control and customization that is otherwise inaccessible. The capabilities unlocked—including sideloading applications, removing unwanted system software, accessing the underlying file system, and executing powerful shell commands—transform the device from a simple media player into a flexible and highly configurable computing platform.
This Chromecast how-to guide explains what Android Debug Bridge (ADB) is, how it works, and how to enable and use ADB to gain full control of your Google TV Streamer (or Chromecast with Google TV). Some most useful ADB commands for managing your Google TV Streamer are also listed.
Please note this guide applies to Google TV Streamer and Chromecast with Google TV (both 4K and HD versions). Other Chromecast devices (Chromecast 1st Gen, 2nd Gen, and 3rd Gen) are not running Android and, therefore, cannot be accessed via ADB.
This guide also applies to most Android TV boxes (and Android phones and tablets).
What is Android Debug Bridge (ADB)?
The Android Debug Bridge (ADB) is part of the platform tools included in the Android Software Development Kit (SDK). It is engineered to facilitate communication between a development workstation and any device running the Android operating system, including Android TV, Chromecast with Google TV, and Google TV Streamer devices. ADB enables various device actions, ranging from installing and debugging applications to accessing a low-level Linux shell for advanced system interaction.
ADB has three components:
- Client: This component resides on the development workstation (e.g., a PC, Mac, or Linux machine). It is the command-line program (adb) that a user invokes in a terminal to send commands.
- Server: A background process running on the development workstation that manages the communication channels. It acts as an intermediary, routing commands from the ADB client to the appropriate device daemon and relaying the results back.
- Daemon (adbd): A background process that runs on the Android device itself (e.g., the Google TV streamer). The daemon listens for commands from the ADB server and executes them on the device, providing a direct interface to the system’s functions.
The client and server are running on the development workstation. The server is responsible for establishing and maintaining a connection between the client on the workstation and the adbd daemon on the Android device. Commands issued from the client are executed on the Android device.
While ADB is fundamentally a tool for software developers, its capabilities extend far beyond application debugging, making it an indispensable utility for advanced users and system integrators. By leveraging ADB, a user can transcend the limitations of the standard graphical user interface to perform a variety of powerful operations. These include sideloading applications (e.g., SmartTube) that are not available on the Google Play Store, removing pre-installed system applications (bloatware), executing advanced system tweaks to modify performance or appearance, and capturing detailed diagnostic logs.
How to enable Android Debug Bridge (ADB) on Google TV Streamer and Chromecast with Google TV?
Before any communication via ADB can occur, the Google TV Streamer or Chromecast with Google TV must be configured to accept incoming debugging connections. This involves unlocking a hidden settings menu (developer options) and then enabling the appropriate debugging protocol.
Step 1: Unlock the Hidden Developer Options Menu
By default, the Developer Options menu (required for ADB) is hidden to prevent inadvertent system changes by novice users.
You may follow these steps to unlock developer options and make them available:
- Navigate to the Google TV Streamer (or Chromecast with Google TV) home screen.
- Open the Settings menu. You can select the gear icon located in the top-right corner of the screen, then select all settings.
- Within Settings, select System, and then navigate to the About section.
- Scroll through the list to locate the Android TV OS Build entry. It is critical to select this specific item, not other entries like “Version”.
- Using the remote control‘s primary selection button (in the center of the D-pad), press it repeatedly on the Android TV OS Build entry. This action must be performed approximately seven times.
- After a sufficient number of presses, a small heads-up notification message (a “toast“) will appear at the bottom of the screen stating, “You are now a developer!”
- Return to the Settings > System screen. A new entry, Developer options, will now be visible in the menu.
You may check this guide for a detailed explanation with screenshots on how to enable developer options on Chromecast with Google TV and Google TV Streamer.
Step 2: Enabling USB Debugging (and/or Wireless Debugging)
With the Developer options menu unlocked, the final step on the Google TV Streamer (or Chromecast with Google TV) is to enable the debugging daemon.
So, on the developer options, you need to enable USB Debugging or Wireless Debugging, depending on whether your Google TV Streamer (or Chromecast with Google TV)is connected to the internet through WiFi or through the Ethernet port (or a USB-C hub with Ethernet port). Prior to Android 11 13, USB debugging, once enabled, actually activates the adbd process and allows it to listen for connections over both USB and TCP/IP. Since Android 13, Wireless Debugging has been separated from USB Debugging.
Since both Google TV Streamer and Chromecast with Google TV were updated to Android 14 in 2025, you must ensure that Wireless Debugging is enabled if your device is connected to WiFi directly (not via an Ethernet cable).
The procedure to enable USB Debugging or Wireless Debugging is as follows:
- From the Settings > System, select the Developer options.
- Scroll down to the Debugging section.
- Locate and activate the toggle switch for USB debugging.
- A confirmation dialog will appear, asking for permission to allow USB debugging. Select OK or Allow to enable the feature.

If your Google TV Streamer or Chromecast with Google TV connects to the internet through WiFi, you need to enable Wireless Debugging, which requires a pairing process in the connection phase. Please refer to this detailed Android ADB Wireless Debugging guide (coming soon).
Now, ADB is enabled on your Google TV Streamer or Chromecast with Google TV.


Installation of ADB Platform-Tools on Your PC/Mac
A functional ADB setup requires the installation of the command-line tools on a workstation. The most common point of failure for users new to command-line interfaces is the incorrect configuration of the system’s PATH environment variable. The PATH is a list of directories that the operating system searches when a command is executed. Without adding the ADB tools’ location to this PATH, the system will be unable to find the adb executable, resulting in a “command not found” error unless the user first navigates to the specific folder containing the tools.
Properly configuring the PATH allows the adb command to be run from any directory in the terminal, which is a critical step for a functional and convenient setup. Otherwise, you need to use the full path to start the ADB client and server.
Acquiring the Official Android Platform Tools
For maximum stability, compatibility, and security, it is imperative to use the official Android SDK Platform-Tools provided by Google. These packages contain the latest versions of adb and other necessary utilities.
Direct download links for the latest standalone packages are available:
- For Windows 10/11: https://dl.google.com/android/repository/platform-tools-latest-windows.zip
- For MacOS https://dl.google.com/android/repository/platform-tools-latest-darwin.zip
- For Linux: https://dl.google.com/android/repository/platform-tools-latest-linux.zip
Installation and PATH Configuration for Windows
- Download the ZIP file and extract its contents to a permanent, easily accessible location, for example, C:\platform-tools.
- Open the Start menu and search for “advanced system settings,” then select the corresponding control panel item.
- In the System Properties window that appears, click the Environment Variables… button.
- In the top half of the next window, under “User variables for XXX,” find and select the variable named Path, then click Edit….
- Click New and enter the full path to the directory where the tools were extracted (e.g., C:\platform-tools).
- Click OK on all open windows to save the changes.
Installation and PATH Configuration for macOS
For macOS users, the simplest method is to use the Homebrew package manager, which handles the installation and PATH configuration automatically.
Of course, you can download and manually install it.
- Download and extract the macOS ZIP file to a location such as ~/platform-tools.
- Determine the default shell by running echo $0 in the Terminal. Since macOS Catalina, the default is Z shell (Zsh).
- Open the appropriate shell configuration file in a text editor. For Zsh, use nano ~/.zshrc; for the older Bash shell, use nano ~/.bash_profile
- Add the following line to the end of the file, replacing the path if necessary: export PATH=$PATH:~/platform-tools
- Save the file (press Ctrl+X, then Y, then Enter in nano).
- Reload the shell configuration by running source ~/.zshrc (or ~/.bash_profile for Bash).
Installation and PATH Configuration for Linux
Similar to macOS, using a system package manager is the most straightforward approach for Linux.
Again, you can download the zip file and set up the PATH manually.
- Download and extract the Linux ZIP file to ~/platform-tools.
- Open the shell profile file for editing, typically ~/.profile or ~/.bashrc, using a command like nano ~/.profile.
- Add the following line to the end of the file: export PATH=$HOME/platform-tools:$PATH
- Save the file and either log out and log back in, or run source ~/.profile (or source ~/.bashrc) to apply the changes.
Verifying the Installation
To confirm that the ADB tools have been installed correctly and that the system PATH is properly configured, open a new terminal or command prompt window and execute the following command:
adb version
A successful installation will output the version information for the Android Debug Bridge, confirming that the tool is ready for use.

Establishing the Wireless Connection between the PC/Mac and Google TV Streamer ( or Chromecast with Google TV)
With the Google TV device and the workstation prepared, the final step is to establish the wireless connection between them.
This guide assumes your Google TV Streamer is connected to the internet through the Ethernet port.
If your Google TV Streamer or Chromecast with Google TV is connected via WiFi, you need to use Wireless Debugging. Please follow this guide because there is a pairing process, and the port number is not fixed.
Locating the Google TV’s IP Address
A successful network connection requires the local IP address of the Google TV streamer. This address is assigned by the local network’s router and is used to uniquely identify the device.
- Method 1 (On the Device): This is the most reliable method. Navigate to Settings > System > About > Status on the Google TV Streamer. The local IP address will be displayed, typically in the format 192.168.x.x. An alternative path is Settings > Network & Internet, where selecting the currently connected Wi-Fi network will reveal its status details, including the IP address.
- Method 2 (Router Interface): An alternative method is to access the administrative interface of the home’s Wi-Fi router via a web browser. The router’s interface will contain a list of all connected devices, from which the Google TV’s IP address can be identified.
Initiating the Connection
- Confirm that both the workstation and the Google TV Streamer are connected to the same local network (e.g., the same Wi-Fi network).
- Open a terminal or command prompt on the workstation.
- Execute the adb connect command using the IP address obtained in the previous step. The standard syntax is:
adb connect <IP_ADDRESS>
For example: adb connect 192.168.1.101.
You can also explicitly state port 5555, which is the standard port for ADB over TCP/IP for USB Debugging. If the initial command fails, try the following syntax:
adb connect <IP_ADDRESS>:5555
For example: adb connect 192.168.1.101:5555
The RSA Key Fingerprint Authorization
Upon the first successful connection attempt from a new workstation, a critical security handshake must be completed on the Google TV Streamer (or Chromecast with Google TV).
- A dialog box will appear on the TV screen with the title “Allow USB debugging?”, as shown in the screenshot below.
- This dialog will display the unique RSA key fingerprint of the connecting computer and ask for authorization.
- Using the remote control, check the box labeled “Always allow from this computer”. This action adds the computer’s key to a list of trusted devices, streamlining future connections.
- Select ALLOW or OK to complete the authorization. This step is crucial; failing to grant this permission is a primary cause of “device offline” errors.

Verifying the Connection
After authorizing the connection on the TV, it is important to verify the connection status on the workstation with the following command:
adb devices
A successful and authorized connection will be indicated by an output line showing the device’s IP address and port, followed by the state of the devices, as shown in the screenshot below.
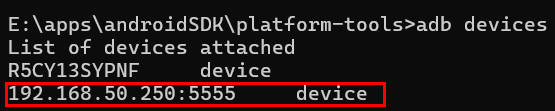
It is worth noting that the initial adb connect command may report a failure to authenticate immediately after the authorization prompt is accepted on the TV. This is normal behavior. Simply re-issuing the adb connect command a second time will typically result in a successful connection.

How to use Android Debug Bridge (ADB) on Google TV Streamer and Chromecast with Google TV?
Once the connection between the workstation and Google TV Streamer (or Chromecast with Google TV) is established, you can use ADB commands to manage and control the Google TV.
Here are just some examples.
Application Management (Sideloading and Debloating)
A primary use case for ADB is managing applications beyond the capabilities of the Google Play Store.
- Installing Apps (Sideloading): To install an application from its .apk file, use the adb install package.apk command. This is useful for installing apps not available in the official store (e.g., SmartTube) or for testing development builds. The command requires the full path to the .apk file on the workstation. The simple way is to put the APK file in the platform-tools folder.
- Listing Installed Apps: Before an app can be uninstalled, its official package name must be known. The command adb shell pm list packages will display a list of all installed packages. To narrow this down to only user-installed (non-system) applications (e.g., VLC player or Prime Video), the -3 flag is highly effective: adb shell pm list packages -3 .
- Uninstalling Apps (Debloating): Many devices come with pre-installed applications that cannot be removed through the standard interface. ADB provides the means to uninstall some of these apps using the adb uninstall <package_name> command. The package name identified in the previous step is used as the argument for this command.
File System Interaction
ADB facilitates direct file transfers between the workstation and the Google TV Streamer’s file system.
- Pushing Files: The adb push <local_file> <remote_destination> command is used to copy a file or directory to the Google TV. This can be used for transferring media files, application configuration files, or other assets.
- Pulling Files: Conversely, the adb pull <remote_file> <local_destination> command retrieves a file or directory from the Google TV. This is particularly useful for backing up data, retrieving log files for analysis, or saving screenshots captured via the shell.
Accessing the Remote Shell
The adb shell command is a powerful feature that opens an interactive command-line session directly on the Google TV Streamer’s underlying Linux-based operating system. Within this shell, standard Unix commands such as ls (list files), cd (change directory), and rm (remove file) can be used for advanced file management. Furthermore, device-specific commands can be executed, such as wm size to check or even change the display resolution.
Simulating Remote Control Inputs
For automation and scripting, ADB can simulate physical remote control button presses. The command adb shell input keyevent <key_code> sends a specific key event to the system. This allows for scripting complex sequences of actions. Key codes relevant for a TV interface include:
- 3: HOME
- 4: BACK
- 19, 20, 21, 22: DPAD UP, DOWN, LEFT, RIGHT
- 23 or 66: DPAD CENTER / ENTER
- 24, 25: VOLUME UP, DOWN
- 26: POWER ON/OFF
- 85: MEDIA PLAY/PAUSE
Practical ADB Command and Control for Google TV
The following table details some of the most useful ADB commands for managing your Google TV Streamer and Chromecast with Google TV. They also work equally on most Android TV devices.
Please note if you have two or more Android devices connected, you need to use: adb -s <ip>:5555 <command> to specify the device.
| Function Group | Command | Full Syntax | Description | Example Usage |
| Connection Management | devices | adb devices | Lists all connected and authorized devices. | |
| connect | adb connect <IP>[:<port>] | Connects to a device over the network. | adb connect 192.168.1.101 | |
| disconnect | adb disconnect <IP>[:<port>] | Disconnects from a specific network device. | adb disconnect 192.168.1.101 | |
| kill-server | adb kill-server | Terminates the ADB server process on the workstation. | ||
| Application Management | install | adb install <path_to_apk> | Installs an application from an APK file. | adb install C:\downloads\new_app.apk |
| install -r | adb install -r <path_to_apk> | Re-installs an existing application, keeping its data. | adb install -r C:\downloads\app_update.apk | |
| uninstall | adb uninstall <package_name> | Uninstalls an application using its package name. | adb uninstall com.example.bloatware | |
| list packages | adb shell pm list packages -3 | Lists all installed application package names. The -3 flag filters for third-party apps only. | adb shell pm list packages -3 | |
| clear | adb shell pm clear <package_name> | Clears all data and cache for a specific application. | adb shell pm clear com.example.buggyapp | |
| File Transfer | push | adb push <local_path> <remote_path> | Copies a file from the workstation to the device. | adb push config.txt /sdcard/ |
| pull | adb pull <remote_path> <local_path> | Copies a file from the device to the workstation. | adb pull /sdcard/log.txt . | |
| Device Control | reboot | adb reboot | Reboots the device. | adb reboot |
| input keyevent | adb shell input keyevent <key_code> | Simulates a key press on the device. | adb shell input keyevent 3 (Home) | |
| Information & Diagnostics | logcat | adb logcat | Displays the device’s system log in real-time. | adb logcat |
| get-serialno | adb get-serialno | Displays the device’s unique serial number. | adb get-serialno | |
| wm size | adb shell wm size | Displays the current screen resolution of the device. | adb shell wm size |
Do you have any questions about enabling and using the Android Debug Bridge (ADB) on Google TV Streamer and Chromecast with Google TV?
Please let us know your questions or comments on enabling and using the Android Debug Bridge (ADB) on Google TV Streamer and Chromecast with Google TV in the comment box below.


The community will try to help you find the solution.
For Chromecast Audio guides, please visit the Chromecast Audio guide page.
If your question is on Chromecast, including Chromecast Ultra, 1st generation Chromecast, 2nd gen Chromecast (aka Chromecast 2015), and the 3rd gen Chromecast (Chromecast 2018), please visit the Chromecast how-to guides page.

Malatya masaj randevu says
This is my first time pay a quick visit at here and i am really happy to read everthing at one place